Turning a favorite photograph into an embroidery pattern is part craft, part translation and entirely rewarding. This guide walks you through the whole journey — from choosing or shooting a photo, to tracing and simplifying details, to picking stitches and executing the final piece. Expect practical workflows, tool recommendations, and real-world tips that save time and frustration.
Why start with a photo?
Photos capture a moment, a face, or an object with instant clarity and personality, which makes them compelling sources for embroidery. They provide reference for proportion, light, and color that you can either reproduce faithfully or reinterpret in thread.
Using a photo speeds the design phase because you already have the composition and subject. Your job is to simplify and decide what to keep, what to suggest, and what to omit so the medium of thread can do its best work.
Choosing the right photo: what works and what doesn’t
Not every photograph will translate well into stitches. Look for images with clear lighting, simple backgrounds, and good contrast between your subject and its surroundings. Overly busy photos will fight against the limited resolution of embroidery.
A portrait with dramatic backlighting or heavy shadows can be difficult to render; soft, even lighting is often easier to interpret. Similarly, extreme close-ups may lose context while very small, distant subjects can become mushy when scaled up.
Photography tips to improve your source images
If you can control the photo, aim for steady light and a clean background. Natural window light or shaded outdoor light reduces harsh shadows and shows more detail in both highlights and midtones.
Use a tripod or stable surface to avoid motion blur. Shoot at the camera’s highest resolution and avoid heavy JPEG compression so you have maximum detail to work with during the pattern-making process.
Keep these quick settings in mind: low ISO to reduce noise, mid-range aperture for sufficient depth of field, and manual focus if your camera lets you fine-tune. If you style a subject, choose clothing or props that won’t create distracting textures.
Preparing the photo: cropping, contrast, and simplifying
Before you trace, crop the image to focus on the composition you want to embroider. Removing extraneous elements clarifies proportion and reduces decision fatigue later. Smaller canvases translate better into clear embroidery designs.
Next, adjust contrast and clarity. Increasing midtone contrast or using a “clarity” slider helps defining shapes and edges, which makes them easier to trace. Be careful not to over-sharpen; stitching wants soft transitions more than photographic crispness.
Simplify by posterizing or reducing colors to the essential tones of your subject. The goal is to identify major planes and shapes that will become areas of uniform stitches or stitch directions.
Methods of converting a photo into a pattern: digital workflow
Digital conversion gives you precise control and repeatability. Start with a high-resolution image and work in a layered editor like Photoshop, GIMP, or Affinity Photo. Duplicate the image and work on a copy so you always have the original to fall back on.
Use posterize, threshold, or edge-detection filters to reduce complexity. Posterize keeps color blocks while edge detection highlights contours that will become outlines. Tweak these tools to keep the shapes that matter for stitching.
For vector-based editing, trace the simplified bitmap in a program like Inkscape or Illustrator to create smooth, scalable shapes. Vector paths let you resize without losing shape clarity and help when mapping stitch direction later.
Software tools: what to choose and why
There is no single “best” tool; choose based on budget, comfort level, and whether you aim to hand-stitch or machine-embroider. Free options like GIMP and Inkscape are powerful enough for most pattern-making. Paid tools such as Adobe Photoshop and Illustrator add convenience and advanced filters.
If you plan to machine-embroider, specialized digitizing software (e.g., Ink/Stitch, Hatch, Wilcom) turns shapes into stitch files (.dst, .pes, etc.) with options for density, underlay, and stitch type. Ink/Stitch is free and integrates with Inkscape for a complete open-source workflow.
Here’s a compact comparison table to orient you.
| Tool | Best for | Notes |
|---|---|---|
| GIMP | Bitmap editing, posterizing | Free, great for preparing images |
| Inkscape | Vector tracing, layout | Free, works with Ink/Stitch for digitizing |
| Photoshop | Advanced photo tweaks | Paid, powerful editing and filters |
| Ink/Stitch | Embroidery digitizing (free) | Open-source, integrates with Inkscape |
| Hatch / Wilcom | Professional digitizing | Paid, industry-standard features |
Manual and analog tracing techniques
Not everyone wants to go digital. I often start with a printed photo taped to a window and a sheet of tracing paper over it to capture contours by hand. This tactile start helps me decide which lines feel essential before I commit them to fabric.
The grid method is excellent for scaling: draw a grid over your photo and a proportionally larger grid on your tracing surface, then copy the value of each square. This method preserves proportion without fancy tools and is portable if you want to stitch outdoors or while traveling.
Other reliable transfers include using a lightbox, carbon transfer paper, or a mechanical pencil rubbing on the back of a printed copy (graphite transfer). Freezer paper makes a handy temporary template — iron it to lightweight fabrics to trace and peel off when done.
Breaking the photo into stitchable elements
Think of embroidery as a language of marks; your job is to translate photographic values into stitch types. Start by identifying large flat areas, mid-tone shapes, highlights, and edges. Each category suggests different stitch choices and directions.
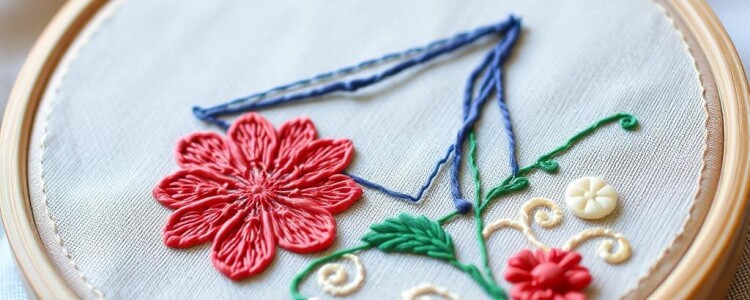
Simplify textures into suggested marks. Hair becomes flowing long-and-short stitches or directional satin stitches. Leaves might be rendered with detached lazy daisy stitches or subtle satin ribs, depending on scale.
Create a map on your pattern showing which stitch goes where so you have a clear assembly plan. I mark areas with codes like “S1” for satin, “L/S” for long-and-short, and “BK” for backstitch edges; this prevents indecision while you work.
Choosing stitches: a practical stitch map
Select stitches according to the visual function they serve: outline, fill, texture, or highlight. Here’s a compact stitch guide to match photographic elements to embroidery techniques.
| Photo element | Recommended stitch(s) | Why |
|---|---|---|
| Sharp edges/contours | Backstitch, split stitch | Provides crisp definition |
| Large smooth surfaces | Satin stitch, long-and-short | Creates smooth planes and sheen |
| Gradual shading | Long-and-short, layered satin | Allows color blending and soft transitions |
| Textured areas (fur, grass) | Seed stitch, straight stitch variations | Suggests texture without literal detail |
| Sparkle or small highlights | French knots, French knot clusters | Adds three-dimensional points of light |
Designing stitch direction and flow
Stitch direction is one of the most powerful tools for suggesting form and movement. For a curved surface like a cheek or a pet’s flank, orient long stitches to follow the contour so the thread catches light similarly to the photographed surface.
Make a directional plan on your transfer — arrows indicating the flow of stitches for each area. Good directionality makes small stitch units read as part of a continuous form, which is crucial for convincing portraits and organic subjects.
Color selection: building a palette from a photo

Start by identifying the photo’s key colors and then reduce them to a manageable palette, typically five to twelve colors depending on project size. Too many subtle shades can overcomplicate hand embroidery; the goal is to suggest depth, not recreate every pixel.
Use physical thread samples when possible. Photographic color can be misleading because of screen calibration and lighting. Laying threads side-by-side against the printed or on-screen reference helps you see which combinations truly read like the subject.
Blend threads by using two strands of different colors together for gentle gradients. This technique achieves soft transitions without needing a unique thread for every subtle hue in the photo.
Choosing thread and materials
Embroidery floss, perle cotton, silk threads, and specialty metallics all have unique properties. Floss is versatile for most hand embroidery, offering easy separation of strands for fine control. Silk and rayon give a luminous sheen for highlights, while perle adds texture and body.
Select fabric according to the final use and thread type. A tightly woven linen or cotton works best for fine detail, while looser weaves support bolder, textural stitches. Consider the weight of your threads: heavy threads need sturdy fabric and different hooping techniques.
Needle sizes, thread counts, and stitch density
Needle selection affects how each stitch sits on the fabric. Use a fine needle for delicate areas and a larger needle for chunky texture. Match needle eye size to the number of strands to avoid fraying or large holes.
Stitch density refers to how close together your stitches are. High density creates smooth surfaces; low density reads as textured or sketchy. For long-and-short shading, a moderate density with overlapping stitches usually produces the best blend without creating stiffness.
Scaling your pattern and estimating stitch counts
Before transferring the pattern to fabric, decide on final size and calculate approximate stitch counts. If you are digitizing for a machine, most software will estimate stitch counts based on area size and density settings. For hand stitching, you can estimate by sampling a small square at the chosen stitch density.
Keep scale in mind for facial details and eyes: too small and they become indistinct specks. If you want fine detail, increase the physical scale rather than cram more stitches into a tiny area — thread has a physical minimum size that limits resolution.
Transferring the pattern to fabric
Transfer technique depends on the medium and the final look you want. Common methods include tracing with a water-soluble transfer pen, ironing a printed design with fusible web, or using wash-away stabilizer. Each method has pros and cons regarding permanence and visibility.
When using a transfer pen, test on a scrap of the same fabric to ensure the lines wash out cleanly. For delicate fabrics, a very light stitch or temporary basting to indicate main lines can be safer than chemical transfers. I often trace with a removable fabric marker for bold lines and use faint thread basting for placement of larger shapes.
Creating templates and notations on your pattern
Add helpful notations: stitch type codes, color keys, stitch direction arrows, and priority numbers for which areas to stitch first. This becomes your roadmap and helps you avoid costly mistakes like stitching background areas before delicate foreground details.
If a pattern is complex, split it into numbered pages or transparent overlays so you can work on a single area without obscuring adjacent instructions. Keep a separate legend with thread counts and specific brand/color numbers to maintain consistency if you revisit the project later.
Hand-stitching techniques for photographic realism
Long-and-short stitch is a cornerstone for achieving subtle shading and lifelike transitions. Work in small overlapping passes and alternate colors gradually to avoid sudden jumps. Keep stitches short enough to tuck neatly into the surface without creating lumps.
For tiny details like eyelashes, veins, or fine contours, use single-strand backstitch or split stitch. These provide crisp lines without overwhelming surrounding fills. For sparkles and bright highlights, strategic French knots or seed stitches add tactile interest.
Underlay and support stitches: why they matter

In machine embroidery, and sometimes in handwork for structure, underlay stitches stabilize the fabric and support the top stitches. Underlay prevents puckering, establishes a foundation for sheen, and helps control stitch density across different shapes.
For hand embroidery, subtle basting or layered tiny straight stitches can function like underlay by holding fabric tension and preventing gaps. I often stitch a faint foundation within smooth satin areas before filling to ensure consistent coverage.
Digitizing for machine embroidery: basic concepts
Digitizing converts shapes into stitch commands. Key concepts include stitch type selection, underlay, density, pull compensation, and run direction. Each of these affects how the final stitch set will look and how the fabric reacts during stitching.
Start with clear vector shapes and assign stitch types to each area. Use sensible densities for thread type and fabric: too dense causes puckering, too sparse looks patchy. Test on similar materials and adjust density, underlay, and compensation until results are stable.
Punching stitches: a step-by-step for a machine file
Step 1: Import or redraw clean vector shapes in your digitizing software. Step 2: Assign stitch types and order the areas logically from back to front. Step 3: Define underlay for each area and set stitch densities appropriate to thread and fabric. Step 4: Add trims, jump stitches, and compensation where edges require it.
Step 5: Simulate or preview the stitch file to spot overlaps and questionable densities. Step 6: Export the stitch file and run a test on a stabilizer-backed scrap. Step 7: Tweak based on the test, particularly density and pull compensation, until the sample looks correct.
Testing and sampling: why swatches save time
Make at least one test swatch before committing to the final fabric. Use the same fabric, thread, and stabilizer, and run a scaled-down version of complex areas. Swatches reveal issues like thread sheen differences, tension problems, and the need to change stitch direction.
I keep a labeled swatch book with notes about settings that worked or failed. Over time this becomes a fast reference that saves hours you would otherwise spend re-testing common fabrics and thread combinations.
Hooping, stabilizers, and hoop tension
Proper hooping prevents distortion. Hoop with the stabilizer and fabric as a sandwich when necessary and make sure the fabric is taut but not stretched. Overtightening causes distortion once stitches pull; too loose allows puckering during stitching.
Choose stabilizer weight based on stitch density and fabric. Lightweight stabilizer is enough for sparse designs on medium-weight fabric, while heavy fills require firm stabilizers to resist pull. Tear-away stabilizer works for many projects; wash-away stabilizer is excellent for delicate fabrics or intricate transfers.
Common problems and how to fix them
Puckering: reduce stitch density, use more stabilizer, or loosen hoop tension. Thread breakage: check needle size and quality, reduce thread tension, and inspect for burrs on the machine’s needle plate. Gaps in fill areas: increase density slightly or adjust underlay.
Uneven sheen: change stitch direction or choose threads with more uniform sheen. Lost detail: increase scale or choose stitches that emphasize edges like split stitch or backstitch. Document fixes on your swatch notes so solutions are repeatable.
Finishing techniques that elevate the piece
Think beyond the stitched surface. Blocking and steaming reshape any small distortions. Consider a backing fabric or framing approach that complements the design and protects delicate stitches. A linen backing faced with a neat binding makes even casual pieces feel finished.
For wearable or functional items, secure thread ends carefully and reinforce high-stress seams. Use a lightweight fusible interfacing to add structure for bags or garments, and double-stitch critical attachment points for durability.
Project workflow: step-by-step example turning a portrait into a stitchable pattern
Step 1: Choose a clean portrait photo with even light and high resolution. Step 2: Crop to the desired composition and posterize to four or five tonal regions in your editor. Step 3: Trace main contours and landmark features on a new layer, simplifying where necessary.
Step 4: Convert traced shapes into vector paths and label each area for stitch type and color. Step 5: Create a color key with thread numbers and note stitch directions. Step 6: Transfer to fabric using a wash-away pen or stabilizer-backed transfer and stitch from background to foreground, testing small details as you go.
When I embroidered my sister’s terrier from a photo, I posterized the image to six tones and used a combination of long-and-short stitch for the body and tiny French knots for the muzzle’s salt-and-pepper texture. Testing small patches let me refine the knot density for realistic fur highlights.
When to simplify rather than replicate
Realism is tempting but not always the most effective outcome for thread. Embrace stylization when details are too fine for your chosen scale. Suggesting texture and expression often reads better than attempting to recreate every photographic nuance.
Think in layers of suggestion: one well-placed highlight, a few directional stitches for fur, and a clear outline for structure can communicate a subject far more effectively than a crowded, detail-heavy approach.
Ethical and legal considerations
Respect copyright and privacy. Use your own photos or those you have permission to use, especially for commercial pieces. For public figures and widely available imagery, check for licensing requirements before creating work you intend to sell.
When working from someone’s portrait, obtain their permission if you plan to display or sell the resulting embroidery. This avoids potential issues around likeness rights and is simply courteous.
Sharing, selling, and protecting your patterns
If you plan to sell patterns, provide clear instructions, color keys, and a reference image. Offer multiple file formats for digital transfers and consider including both a printable PDF and a digitized stitch file for machine embroiderers if you have the skills to create both.
Protect your digital patterns by watermarking preview images and licensing them with terms that specify how buyers may use them. Consider selling through established marketplaces that offer buyer protection and visibility to your niche audience.
Learning and community resources
Join embroidery forums, social media groups, and local guilds to get feedback and discover new techniques. I learned more troubleshooting tricks from a single community critique than from a dozen how-to videos. Live feedback helps you spot patterns of error and improvement quickly.
Books such as “The Embroiderer’s Handbook” and online courses specific to digitizing or portrait embroidery can accelerate your learning. Practice regularly on small projects to build confidence and to understand how different threads, needles, and fabrics behave.
Checklist: the essentials before you stitch

Make a short checklist so nothing is forgotten on stitch day: high-resolution image, simplified pattern, color key with thread brands and numbers, transfer method tested, stabilizer and backing selected, hooping plan, needle and thread matched to fabric, and at least one test swatch completed.
- Image prepared and simplified
- Stitch map and color key made
- Test swatch complete
- Supplies and stabilizers ready
- Transfer method verified
Next steps and continuing your practice
Start small: convert a simple still life or a single-feature portrait before attempting full-face realism. Each project teaches something new about proportion, stitch economy, and how light reads in thread. Repeat smaller lessons and gradually increase complexity.
Keep a project journal with photos at each stage, stitch settings, and reflections on what worked. Over months this becomes an invaluable archive that speeds future work and makes your process more consistent.
Designing Your Own Embroidery Patterns from Photos is a rewarding practice that blends visual problem-solving with tactile craft. Whether you choose hand or machine techniques, the key is to simplify, test, and iterate. With the workflows and tips in this guide, you should be able to take any suitable photo and transform it into a stitchable, beautiful piece of embroidery — and enjoy the creative translation along the way.


